> For the complete documentation index, see [llms.txt](https://docs.getgymini.com/gymini/llms.txt). Markdown versions of documentation pages are available by appending `.md` to page URLs; this page is available as [Markdown](https://docs.getgymini.com/gymini/features/features-overview/email/mailgun/setting-up-mailgun/cloudflare-domain-setup.md).
# Cloudflare Domain Setup
### Introduction
Setting up custom domains with Mailgun can be a bit challenging for some users. This guide aims to simplify the process, using a video tutorial as a reference. By the end, you'll have a clear understanding of how to set up Mailgun custom domains, particularly with Cloudflare, though the principles can be applied to any DNS provider.
### Overview
The process involves:
1. Logging into Mailgun and your DNS provider (Cloudflare in this example).
2. Creating a subdomain in Mailgun.
3. Adding the necessary DNS records in your DNS provider.
4. Verifying the DNS records in Mailgun.
## Step-by-step Mailgun Setup
1\. Sign up for [Mailgun.com](https://signup.mailgun.com/new/signup)
2\. Check your email inbox to verify the email address
3\. Login to Mailgun, Click on **Sending** > **Add New Domain**
4\. If your domain is companyname.com, you can either set up the main domain or subdomain with Mailgun.
A. Main domain:
* If you are adding the main domain,[ it should not be used with Gsuite, or any other email provider](https://help.mailgun.com/hc/en-us/articles/203357040-Can-I-Use-the-Same-Domain-Name-for-Mailgun-and-for-Google-Apps-Or-Another-Email-Server-)
Subdomain:
* To set up the subdomain with Mailgun, you can type **ANYTHING\_HERE**.companyname.com
* Examples:
* mg.companyname.com
* replies.companyname.com
* support.companyname.com
B. Please set up the domain or subdomain under US, **not EU. not EU. not EU.**
C. Click on **Add domain**
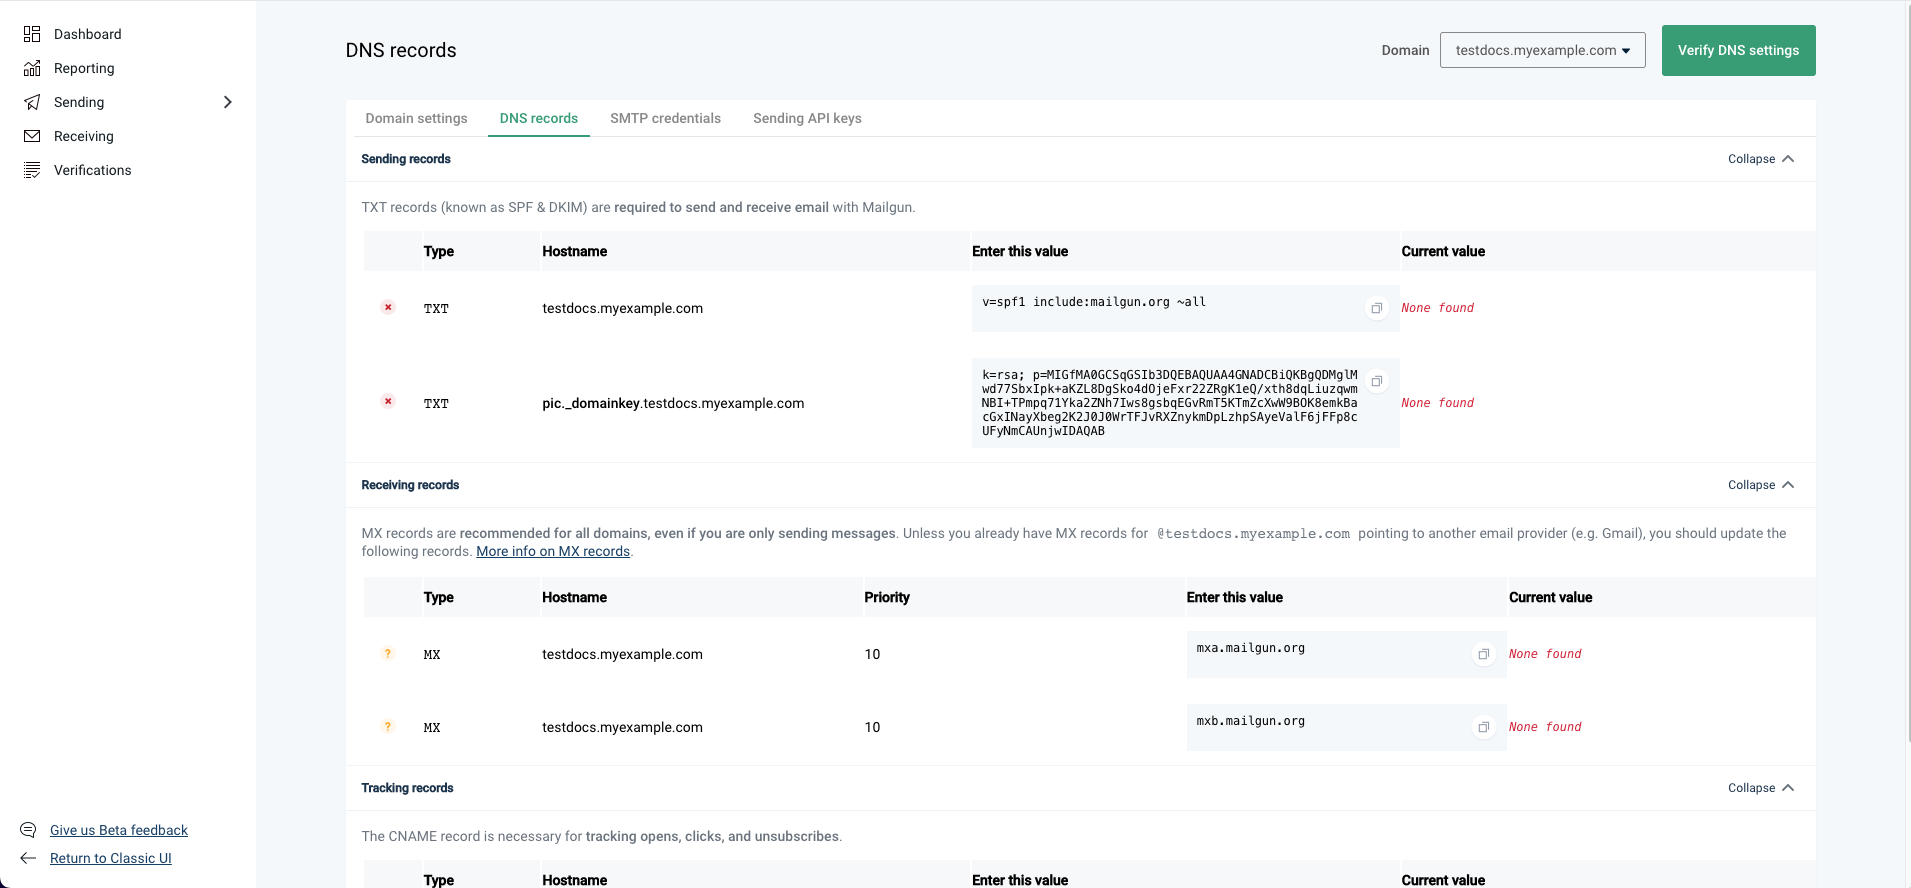
The next screen that you're taken to will ask you to add DNS records to your domain. Leave this screen open for the next step.
5\. Now log in to your DNS records based on where you get the domain and add the 5 DNS records.
### To add the 1st TXT record
\
To [Add your first TXT record](https://developers.cloudflare.com/dns/manage-dns-records/how-to/create-dns-records/), Log in to the [Cloudflare dashboard](https://dash.cloudflare.com/login) and select an account and domain.
Click on **DNS > Records**
Click on **+ Add Record**
A. Type: Select **TXT** from the Type menu options.
B. Name: **DO NOT INCLUDE THE ROOT DOMAIN**
* Depending on the subdomain you are trying to set up, if you are trying to set up
* [mg.companyname.com](https://mg.companyname.com/) The host name will be **mg**
* [replies.companyname.com](https://replies.companyname.com/) The host name will be **replies**
* If you are setting up a **main** domain like companyname.com, the host name will be **@**
C. Content: Same for everyone
* paste the following record **v=spf1 include:mailgun.org \~all**
D. Click on **Save**
### To add the 2nd TXT record
Click on **+ Add Record** again
A. Type: Select **TXT** from the Type menu options.
B. Name: it's a bit tricky but the key here is to copy everything from the beginning until the subdomain part, **DO NOT INCLUDE THE ROOT DOMAIN**
**\*\*Everyone's 2nd TXT record host name and value is different**
Examples: **copy the highlighted part ONLY**
|
| [](https://s3.amazonaws.com/cdn.freshdesk.com/data/helpdesk/attachments/production/48284380223/original/JSERXQQhYNvzVp7YoXhIji_yeomZNLXUKA.png?1677632951) |
C. Content: Head back to Mailgun and Copy the 2nd TXT record here **highlighted in the screenshot below**
* Content: paste the 2nd very long copied TXT record here
D. Click on **Save**
### To add the 1st MX records
Click on **+ Add Record** again
If you have a Gsuite account to capture incoming emails for the main domain. Make sure you are using a subdomain for Mailgun. Check out [Can I Use the Same Domain Name for Mailgun and for Google Apps (Or Another Email Server)?](https://help.mailgun.com/hc/en-us/articles/203357040-Can-I-Use-the-Same-Domain-Name-for-Mailgun-and-for-Google-Apps-Or-Another-Email-Server-)
A. Type: Select **MX** from the Type menu options.
B. Name: Different for everyone
Depending on the subdomain you are trying to set up, if you are trying to set up
[mg.companyname.com](https://mg.companyname.com/) The host name will be **mg**
[replies.companyname.com](https://replies.companyname.com/) The host name will be **replies**
If you are setting up a **main** domain like companyname.com, the host name will be **@**
C. Mail Server: Same for everyone
paste the following data **mxa.mailgun.org**
D. Priority is **10** which is also same for everyone no matter what domain you are trying to set
E. Click on **Save**
### To add the 2nd MX records
Click on **+ Add Record** again
A. Type: Select **MX** from the Type menu options.
B. Name: Different for everyone
Depending on the subdomain you are trying to set up, if you are trying to set up
[mg.companyname.com](https://mg.companyname.com/) The host name will be **mg**
[replies.companyname.com](https://replies.companyname.com/) The host name will be **replies**
If you are setting up a **main** domain like companyname.com, the host name will be **@**
C. Mail Server: Same for everyone
paste the following data **mxb.mailgun.org**
D. Priority is **10** which is also same for everyone no matter what domain you are trying to set
E. Click on **Save**
### To add the CNAME record
In Cloudflare, Click on **+ Add Record** again
A. Type: Select **CNAME** from the Type menu options.
B. Name: Different for everyone
Head back to Mailgun to copy the host name, it's a bit tricky but the key here is to copy everything from the beginning until the subdomain part, **DO NOT copy the main domain**
Depending on the subdomain you are trying to set up, if you are trying to set up
* mg.companyname.com The host name will be **email.mg**
* replies.companyname.com The host name will be **email.replies**
If you are setting up a **main** domain like companyname.com, the host name will be **email**
C. Target: Same for everyone
paste the following data **mailgun.org**
D. Click on the orange cloud Proxied to make it **DNS only**
E. Click on **Save**
Now that you have added 5 records, Go back to Mailgun and click on **Verify DNS Settings**
Click the same button to **Verify DNS Settings** again if some records are still not showing the green checkmark
### Conclusion
Setting up custom domains with Mailgun is a straightforward process once you understand the steps. This guide, combined with the video tutorial, should provide you with all the information you need to successfully set up your custom domain. Remember, while this example used NameCheap, the principles remain the same for other DNS providers.